Friday, February 26, 2016

VSD Project

This month I took a Visual Development class at Full Sail University. We were given a scene and tasked with creating UVs and Textures for the scraper and pulley, to create lighting for the scene, create glass materials, apply bump maps, create maps for reflectivity, and create layered textures. I learned a lot about how the Mia Material X Passes works and the different options to change the look of the material. I learned how to use layered textures and alphas to add images, dirt, and other details onto materials. I learned how to manipulate bump and reflectivity maps so that they will only affect certain parts of the object. I also learned how to render out different passes such as beauty, diffuse, indirect, reflectivity, refraction, specular, occlusion, and ID maps and then use those different renders to further manipulate the image in Nuke. I didn't explore many of the tools outside of what was necessary for the assignments, but I did use the tools I learned to more than what was required for my assignment. Here is my final product:


Wednesday, January 27, 2016

VEF1 Project 2: Particle Effects


Our second project for Visual Effects I was to use Legacy Particles. We were given a scene for the project but had the option to make our own scene, I chose to use the scene given. We were required to make a minimum of three Particle effects. I chose to create smoke/steam, sparks, and melted metal. I used a directional emitter for the smoke, I changed the particles into clouds and used expressions to very the lifespan and opacity. I changed the spread to make the smoke go out farther and changed the rate, speed, and lifespan for each of the emitters to make them slightly different. For the sparks I also used a directional emitter and made the particles into streaks, I used a ramp to change the colors from red to yellow and a random expression on the lifespan. For the molten metal I used a volume emitter with blobby particles and used a ramp on the color and an expression for the lifespan. I also varied the sizes of the blobby particles and messed with the threshold to get them to meld together. I also animated most of the scene and set up my own camera for the project.

CAN1 Projects

These are the different passes for my class projects created for CAN1 (Character Animation 1).

Project 1: Leggy Walk. We were given a character with only a lower half.  The assignment was to animate it walking and doing a turn around. Here are the three passes I did for this project:


Project 2: Strong poses. We were given a character with a full rig and told to poses that have a strong silhouette and expression. The emotions we were told to portray are calmness, fear, anger, happiness, disgust, and a pose that shows balance. Here is my final for the project:


Project 3: Final Project. We were given a character with a full rig and assigned to do a resting pose, walk, turnaround, and button push for the character. These are the first three passes for this assignment, which is not yet completed.


Monday, January 18, 2016

VEF1 Lesson 1 Project

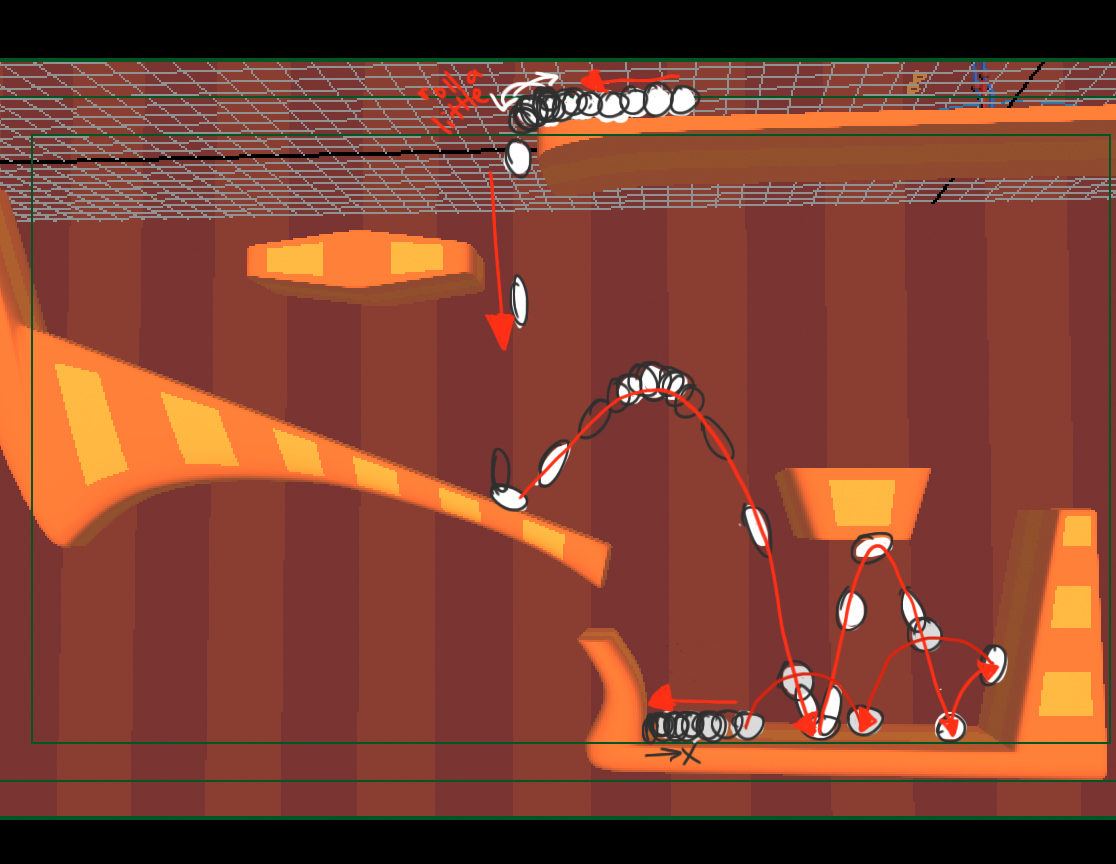
This was my first project for my VEF1 class at Full Sail University. The goal was to use rigid bodies to create an effect. We had the option to create our own scene but I used the scene that was given to us which was a Rube Goldberg machine. When I started the project I made the mistake of using too many rigid bodies and it was interfering with my scene a lot; I was also using way too many separate gravity fields but luckily something clicked after speaking with the lab instructor and I was able to start over with way less hassle. Gravity was the only field I used in this project, I was able to get the spinner at the end to spin with an added spin impulse so there was no need to use a vortex field. As for constraints, I mostly used hinge constraints for things like the hammer and mallet so that the object would move but not wobble. I used a nail constraint on the first cup so it would fall more realistically; however, I did end up using a hinge constraint on the second cup to prevent it from falling wrong and getting stuck on the wall. I used a combination of a hinge and spring constraints on the little trap doors to get them to stay in place and move back into place after being hit by the ball. I also used a spring constraint on the platform at the end that propels the three balls into the air. As for the composition, I like very bright and trendy colors so I used a lot of bright pinks and blues. I only had an area light and two directional lights to illuminate the scene, I wish I had gone back and made more lights because the shadows are so dark, but overall I'm content with the final look. It was a rough start to understand how to do this project but I think the end result came out well and I learned a lot from this assignment.

Thursday, December 17, 2015

CRI2 Research Assignment: Rigging TD

Our assignment for our second rigging class was to find a job listing for a technical artist and compare the job qualifications to what we have learned in class.
I found this listing at Reel Fx, one of the companies I hope to work for in the future:
http://jobs.reelfx.com/positions/rigging-artist-dallas-location-361

To get the job you must meet the following requirements (as listed on the website above):
• Bachelor’s (BA) degree from accredited four-year college or university or equivalent experience
• 2 years production experience
• A strong understanding of animation and modeling workflows
• A strong understanding of human and animal form and bio-mechanics.
• Able to create rigs that allow for a full range of movement, with a logical, easy to use, and well thought out control structure.
• Excellent knowledge of maya, with a strong understanding of the dependency graph, utility nodes, and the use of expressions. A working knowledge of MEL is a must. A working knowledge of Python is preferred. Knowledge of the C++ API is not required, but is a distinct advantage.
• A general understanding of the principles of animation. Must be able to think like an animator when considering how rigs will move. Prior animation experience is a plus.
• Able to work in a team environment, possess strong communication skills, exhibit a high level of motivation.
• Able to communicate creative and technical thoughts and ideas
• Able to multi-task and prioritize
• Able to thrive in a high pressure, deadline oriented environment

• Able to follow directions well

In CRI1 and CRI2 we learned how to create rigs with a full range of movement that are easy for an animator to use. We were taught to always think about what the animator would want in a rig. We were exposed to python scripting and have done almost all of our work in Maya. We focused more on SDKs than expressions but we did go over them in class. We have worked with deadlines and had to follow directions. However, we didn't really go over MEL, we didn't create a non-humanoid animal rig, we didn't use the dependency graph or utility nodes, and we didn't have any sort of team projects.

I researched another job posting from Laika:

The job requirements as listed on the website above are as follows:
  • Bachelor’s degree in relevant area of study or equivalent combination of education and experience.
  • 2-3 years of CG feature film and/or Visual Effects or equivalent rigging experience.
  • Experience working on a fully animated theatrically released CG feature film a plus.
  • Knowledge of Maya, Python and MEL
  • Experience rigging a variety of facial animation systems, including experience with body and prop rigs.
  • Strong knowledge of character kinematics, deformation and biomechanics.
  • Basic modeling skills and ability to understand polygonal mesh flow.
  • Background in visual arts/design with a strong understanding of form, geometry and movement.
  • Ability to provide feedback to team members on work under development and mentor lesser experienced team members.
  • Knowledge of dynamics, Linux experience and Maya C++ plug in development, all a plus.
  • 3D printing experience a plus
In CRI1 and CRI2 we learned how to use Maya for rigging and how to script with Python. We have learned how to rig and weight facial systems. We went over basic modeling skills in Mudbox to create blendshapes. However, we did not learn about Linux, C++, or MEL.


Comparing these two listings, both want experience and a Bachelor's degree, experience in Maya, experience with Python, and how to create basic and easy to use rigs. I think that on the surface it seems like we were more prepared for the Laika job listing because we spent a lot more time learning facial rigs and controls. It also seems to require less experience with certain aspects of Maya, but at the same time requires the knowledge of three other scripting languages instead of two. Scripting can be very hard to learn, I have multiple friends in Game Dev. that run into a lot of troubles learning C++, so it's hard to tell which one we are actually more prepared for. Overall I feel like if I were to get a job as a TD I would need to know more about scripting languages in general since that seems to be a big part of every TD job listing.

Sunday, October 25, 2015

Fundamentals of Animation: Project 3

For project 3 our assignment was to animate the top half of a human pushing a box off of a cliff. We started by assessing one of the thumbnails our teacher provided for us. I chose the following thumbnail that my teacher created:

We received multiple files with a character and box in it. I chose the standard guy with the purple cliff, depicted in the picture below:


We then preceded to follow the thumbnails and put in the key poses and breakdowns. We then used the graph editor to create a smoother animation. This is my finished result:

From this project I learned how to manipulate a upper body rig. I practiced using the graph editor and using proper timing to show weight. In class we learned how to manipulate the rig and graph editor. I learned how to do the timing for my specific project on my own. Overall this was an interesting project to work on and I learned a lot from it.

Fundamentals of Animation: Final Project

For our Final project in Fundamentals of Animation we had to animate our character holding, taking three steps, anticipating, and kicking a ball. We started out by video taping ourselves doing the actions for the animation.

We then created thumbnails to map out the actions that the character and the ball would take based off of our reference video.
Here were mine:


We were also asked to do practice work based on research we did to help us with our walk cycles. I chose to do figure drawings to study human poses:

We then created key poses and breakdowns using our thumbnails, using the graph editor to clean up our movements. Here is my final playblast of my project:
 In this class and through this project I used how to manipulate the graph editor and how to move a character's hips to create a believable walk. I also learned how to use the playblast and how to animate a ball in Maya. We also played with the rigs and were introduced to new types of rigs. Overall I learned a lot about animation from this class.