Thursday, April 28, 2016

VEF2 (Visual Effects 2)

Our first project was to use Maya fluids to make fire.

I started this project by researching different types of fire, there are a lot of references I considered but this one seemed the most interesting to me: https://www.youtube.com/watch?v=NY-bnY0yjWw (start at around 1:45). I liked it because of the rainbow color scheme. I modeled a dish and duplicated it 5 times, I only did 5 instead of 8 because 3 of the fires weren't as eye-catching. I then created a cylinder and deleted everything but the top faces to make a circular plane. I used this as my emitter. I messed with buoyancy and other settings to create my fire. I then made a uniform field to change the direction that my fire moves, I key framed the magnitude of my uniform field every 100 frames to create diversity. I then added point lights to the scene and used a script to make the intensity change randomly. I rendered out my background for 120 frames and my fire for 520 frames, I merged the fire on top of the background in Nuke and then duplicated the fire 5 times, changed the start frames and used a transform node to put them over the other dishes. 

This was my final:


This my Maya playblast for the motion:


Thursday, March 24, 2016

CAN2

These are some of the projects we have done for our second Computer Animation class. 

Our first project for the class was to create a pantomime animation (an animation without sound). We had multiple different scenes that we could choose from for this assignment. We first were tasked with creating prepro for our project:


We then had to create our own reference by filming it. I decided while filming to change the action in my animation. I wanted to keep him jumping for the balloon; but instead of a jumping tamper-tantrum I decided to have him throwing himself to the ground and then doing a tantrum. I found this to be a lot easier to accomplish with the timeline considering I had another class to worry about and I'm still learning how to animate. I also cut the kick/throw portion because it was unnecessary for the story and therefore a waste to animate.

We had to do multiple different passes for this animation, this is my fourth pass, the closest to my final project:


This is my final:


Overall, I like how my animation turned out. Of course there is a lot I could still change to make it better, it's no where near perfect, but I'm content with the quality. I think that the story is clearly portrayed and that his emotions are easily read. I also learned a lot from this assignment, it was my first time doing a jump and I learned a lot from it.

Wednesday, March 23, 2016

STE Research Project

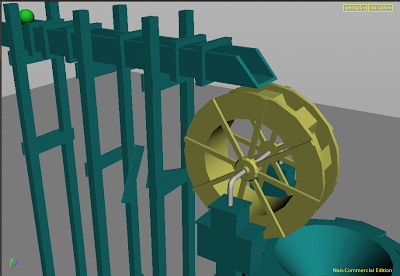
This is the research project I did for my Software Technologies class at Full Sail University. I worked in a two person group with Santiago Suarez. I primarily did the modeling and he primarily did the physical effects in Houdini. I modeled everything except for the canon bolt and slide shown at the end, I did this in Maya and exported OBJ files to bring into Houdini. 

I modeled the runway for the ball to travel down by creating a cube, deleting three of the sides, giving it depth with an extrusion and slanting the end. I then used different sized cubes to make the pillars and support beams.


I modeled the wheel with a pipe primitive, gave it two extra divisions along the height, extruded those for the side walls and then extruded every other inside face to make the panels.


Friday, February 26, 2016

VSD Project

This month I took a Visual Development class at Full Sail University. We were given a scene and tasked with creating UVs and Textures for the scraper and pulley, to create lighting for the scene, create glass materials, apply bump maps, create maps for reflectivity, and create layered textures. I learned a lot about how the Mia Material X Passes works and the different options to change the look of the material. I learned how to use layered textures and alphas to add images, dirt, and other details onto materials. I learned how to manipulate bump and reflectivity maps so that they will only affect certain parts of the object. I also learned how to render out different passes such as beauty, diffuse, indirect, reflectivity, refraction, specular, occlusion, and ID maps and then use those different renders to further manipulate the image in Nuke. I didn't explore many of the tools outside of what was necessary for the assignments, but I did use the tools I learned to more than what was required for my assignment. Here is my final product:


Wednesday, January 27, 2016

VEF1 Project 2: Particle Effects


Our second project for Visual Effects I was to use Legacy Particles. We were given a scene for the project but had the option to make our own scene, I chose to use the scene given. We were required to make a minimum of three Particle effects. I chose to create smoke/steam, sparks, and melted metal. I used a directional emitter for the smoke, I changed the particles into clouds and used expressions to very the lifespan and opacity. I changed the spread to make the smoke go out farther and changed the rate, speed, and lifespan for each of the emitters to make them slightly different. For the sparks I also used a directional emitter and made the particles into streaks, I used a ramp to change the colors from red to yellow and a random expression on the lifespan. For the molten metal I used a volume emitter with blobby particles and used a ramp on the color and an expression for the lifespan. I also varied the sizes of the blobby particles and messed with the threshold to get them to meld together. I also animated most of the scene and set up my own camera for the project.

CAN1 Projects

These are the different passes for my class projects created for CAN1 (Character Animation 1).

Project 1: Leggy Walk. We were given a character with only a lower half.  The assignment was to animate it walking and doing a turn around. Here are the three passes I did for this project:


Project 2: Strong poses. We were given a character with a full rig and told to poses that have a strong silhouette and expression. The emotions we were told to portray are calmness, fear, anger, happiness, disgust, and a pose that shows balance. Here is my final for the project:


Project 3: Final Project. We were given a character with a full rig and assigned to do a resting pose, walk, turnaround, and button push for the character. These are the first three passes for this assignment, which is not yet completed.


Monday, January 18, 2016

VEF1 Lesson 1 Project

This was my first project for my VEF1 class at Full Sail University. The goal was to use rigid bodies to create an effect. We had the option to create our own scene but I used the scene that was given to us which was a Rube Goldberg machine. When I started the project I made the mistake of using too many rigid bodies and it was interfering with my scene a lot; I was also using way too many separate gravity fields but luckily something clicked after speaking with the lab instructor and I was able to start over with way less hassle. Gravity was the only field I used in this project, I was able to get the spinner at the end to spin with an added spin impulse so there was no need to use a vortex field. As for constraints, I mostly used hinge constraints for things like the hammer and mallet so that the object would move but not wobble. I used a nail constraint on the first cup so it would fall more realistically; however, I did end up using a hinge constraint on the second cup to prevent it from falling wrong and getting stuck on the wall. I used a combination of a hinge and spring constraints on the little trap doors to get them to stay in place and move back into place after being hit by the ball. I also used a spring constraint on the platform at the end that propels the three balls into the air. As for the composition, I like very bright and trendy colors so I used a lot of bright pinks and blues. I only had an area light and two directional lights to illuminate the scene, I wish I had gone back and made more lights because the shadows are so dark, but overall I'm content with the final look. It was a rough start to understand how to do this project but I think the end result came out well and I learned a lot from this assignment.